More Categories

Blog Archive

Theme images by Storman. Powered by Blogger.

Sunday, September 21, 2014

Simple way Choosing a Font Program: Comparison of Tier-I Editors

- 9 comments
A quick search has led me to believe that Fontlab Studio is the standard for font editors, as evidenced by their boast that Apple, Adobe, Microsoft, and everyone and their grandma uses it. The problem is its $650 price tag.

That’s nothing unreasonable, as I am no stranger to the high cost of design software. But with this being an experimental endeavor at its core, I’m just not yet ready to spend that. So I’m testing out what I’m calling Tier-I font editors (cheap/free editors). Perhaps one day I’ll be able to afford Fontlab Studio, but these are my initial impressions for FontForge, FontCreator, and Fontlab’s TypeTool.

FontForge (Free)


When I’m looking for anything, my first outreach is to the open-source community to see what’s developed organically. FontForge is precisely that—a free editor lovingly crafted by the open-source dwarves in the fires of Linux Mountain (aka George Williams).

FontForge glyph overview

FontForge seems to meet the need of a basic font editor, and I’ve found it to be powerful and intuitive. I’ve had success making some basic fonts with it (such as my Arpa icon font for this website). And while I’m betting that it can be used by deft hands to craft a font equal to one made in Fontlab Studio, its major drawback is its instability. Although the program is actively maintained, I still found it crashing periodically in Windows 7 and Windows 8. Provided it did work, I (who by no means am a typographer) couldn’t make heads or tails of some of the finer points of the glpyh-editing interface.
FontForge glpyh editor Um, what?

I figured out that the cyan numbers to the right had something to do with the Em units (for this font, set on a scale of 1000), but I was still puzzled nonetheless by the interface. Although I know the x-height, baseline, and cap height are marked by one of those scratchy lines, it’s very difficult to tell where they are at a glance. That, mixed with its instability in Windows 8 led me to pursue more options. But for what it’s worth, I highly recommend FontForge as a basic font editor and initial foray into type crafting.

FontCreator ($199)


At first glace, High-Logic’s font editor seems to be a welcome solution to the problem of font development. Though I’ve not used it extensively, it appears to be stable on Windows 8 (even though its latest version is about as old as FontForge). The workspace is more unified than the floating-window style of FontForge, and the GUI will feel more like a traditional Windows program than FontForge.

FontCreator font overview

The overview gives you the neat option to display either PostType labels, Unicode bindings, or Windows/Mac bindings. It also hides blank glyphs, streamlining the assimilation process. Upon entering the glyph editor, FontCreator has cleaned that up as well, providing clear metrics for glyphs.
FontCreator edit glyph windowAh, nice!

Editing glyphs with FontCreator is fairly intuitive for anyone familiar with Illustrator, and warrants praise for its simplicity and effectiveness as a vector editor.

However, FontCreator’s major drawback is its devious pricing tier: it has two versions. Though the cheaper version for $79 seems to perform most of the functions, it can’t be used for commercial purposes. Further, the home version is devoid of the following features:

  • Union, intersection, and exclusion drawing tools (think Ilustrator’s Pathfinder tools)

  • Auto font weight tools

  • Diacritical tools

  • Auto-kerning tools


As well as other various font glyph cleanup helpers. So if you ever want to sell fonts, this program might as well be $200 to you.

TypeTool ($99)


Last but not least, I tried Fontlab’s dinosaur of a font editor, TypeTool. Although it hasn’t been touched since 2010, upon opening it I could see a pleasant difference. It might be my expectations, but upon seeing the font overview, I saw a view that was similar to FontCreator, but had several improvements:

  • The glyph previews were antialiased (FontCreator’s weren’t)

  • It already had the unicode bindings displayed (I didn’t have to adjust any preferences as in FontCreator)

  • It didn’t have 150 icons filling up my toolbar like FontCreator did.


Fontlab TypeTool font overview

Other parts of the interface felt more polished and more intuitive to navigate. It’s missing the tabs that FontCreator sports for quickly switching between open glyphs, but that doesn’t seem like a huge loss to me. Upon switching to the glyph editor, it quickly became my favorite of the three. It clearly displayed the baseline, x-height, and cap-height, and did me the favor of placing an abbreviation to the left instead of assuming I didn’t know what those lines are.
TypeTool glyph editor windowFont-crafting perfection.

Editing points was every bit as intuitive as FontCreator, but had the additional bonus of displaying coordinates next to points without the need of a status bar as in FontCreator. Somehow, TypeTool was able to display more information with less screen clutter (I turned grid lines on to compare with FontCreator, but those can easily be hidden for zen-style font creation).

TypeTool seems to have all of the features as FontCreator pro version, including merge/intersect tools, font variation and kerning tools, and encoding tools. But it comes at $100 cheaper from a company reputable for releasing industry-level font creation software.

Wrapup


This is a preliminary overview, and I’m still researching other font programs to compare. But from short impressions of demos, TypeTool seems to be the clear winner in both functionality and price.

But the question still remains: why is TypeTool $100 when Fontlab’s other programs—Studio and Fontographer—are $649 and $399, respectively?

Well, according to their chart comparison, the following features are missing in TypeTool:

  • OpenType Feature Editing (Fontographer / Studio)

  • Arabic and Hebrew Support (Studio)

  • Macro Scripts (Studio)

  • Bitmap Editor (Fontographer / Studio)

  • Programmable Font Transformation (Studio)

  • Blended Fonts (Studio)

  • Editable Codepages and Encoding (Fontographer / Studio)

  • Manual Type 1 Hinting (Fontographer / Studio)

  • Manual TrueType Hinting (Studio)

  • TrueType Delta Hinting (Studio)

  • Special Font Effects (Studio)

  • Multiple Master Font Editing (Fontographer / Studio)

  • Tunable Autotracer (Fontographer / Studio)


And for the sake of comparison, the following features are a part of TypeTool, but are missing from Fontographer (Studio retains all of TypeTool’s features):

  • Encoding Templates

  • Diagonal Guides

  • TrueType Hint Preservation

  • Font Auditor


Of the above, the most notable features missing appear to be advanced OpenType wizardry and font hinting. For the record, FontForge supports hinting, while FontCreator does not.

In conclusion, for your basic typographic needs, TypeTool should graciously meet them until you either a) start to lose sleep over your font’s hinting properties, or b) become an OpenType programmer.

TL;DR


  • Buy TypeTool. Then buy Studio when you have the money. Skip Fontographer.

  • I’m poor! Use Font Forge until you find 396 quarters to buy TypeTool. Buy Studio when you save up 2,596 quarters.


Update: Type 3.2 ($69)

I found Type 3.2 after writing this article. While it is comparable to TypeTool, its navigation is different. It’s more floating-window UI like Font Forge, and lacks the glyph compilation overview that all the other programs had. It made assimilating a font and keymapping glyphs feel less organized. Though I didn’t give Type 3.2 the time it deserved, personal UI preference quickly drove me back to TypeTool.

Source From http://dangodesign.net/

How to do vocal removal nicely with Adobe Audition

- No comments
Today one of my friends asked me how to do vocal removal nicely. He told me that he had tried some other softwares like Audacity and the result wasn’t good. I think many people may have these kind of problems too so I should help others.

In this article, I’ll use an audio editing software called Adobe Audition. (Beware: It’s not a freeware and you can get a trial version from Adobe easily.)

P.S. I’m using Adobe Audition CS6 but the method I mentioned here also works in the previous versions.

First, open Audition and load the audio file in.

Audition user interface

Then, click [Favorites -> Remove Vocals].

Favorites -> Remove Vocals

(Under the fx tab, select Stereo Imagery –> Center Channel Extractor. Here you get the option of attenuating vocals, isolating them or boosting them separately. The center channel level adjustment bar (measured in decibels) makes it easy to play with the track levels until they are just right.

The purpose of the video was not to instruct on mashing audio tracks, but you can see how vocal removal can be a useful tool. Before you actually begin mashing, use Adobe Audition and Premiere to build a library of audio and video samples. When you’re working on a piece, it’s nice to have a palette of samples to choose from.  Happy Mashing!)

Removing Vocals

After the processing, it is basically finished. However, if you want to remove the vocals even further, you can follow the steps below:

Click [Effects -> Special -> Vocal Enhancer].

Click [Effects -> Special -> Vocal Enhancer]

Then click [Music -> Apply]. The music will get enhanced and the vocal will be further suppressed.

Vocal Enhancer

Finally, save the file and you’re finished!

(When creating a mash-up, as we will do for our video remix assignment, it can be helpful to begin with a base beat. Unfortunately, it isn’t always easy to find a naturally occurring sample that lends itself well to looping. Even in a song with a basic four bar structure, vocals often begin on an even beat, and drum tracks include fills that sound silly when looped. Adobe Audition makes it easy to remove specific aspects of a track (like vocals or percussive sounds), which makes every song a potential sample for our remixes. Check out the video below…)

Converting Torrents to Direct Download

- No comments
Every things has it’s own perks and everything has it’s owns losses too, kind of like the internet boon we are blessed to have “The torrent Client” has one,’leeches’ which diminishes the download speed.To prevent any loss of time people knock the door of direct download managers like the “Internet Download Manager”. But all the desired files aren’t available on direct download but they might be available on torrent
So this article show the alliance between Torrent and direct .|
A step by step procedure for Converting Torrents to Direct Download

The following steps should be considered

1 Go to your desired torrent site

2 Select your desired torrent

3 Either download  torrent     

 dsds

or right click on download torrent and copy the link address 

dsdsdsds

4.Go to the website www.zbigz.com

ase

5 .xcv


6 Select your desired plan 

rtrt


6 When the  torrent file will finish caching click .zip

bvbvbv

7 Again select your plan
rtrt


8 Then eventually this will happen

yuyu


then this

klkl

You’ll finally be able to download your torrent via direct download


Source from http://gawkingeeks.com/

What Is ‘Magnet Links’ Explained

- No comments
A magnet link is a unique link to a specific file, typically on a P2P file sharing network.

Magnet Links allow users to directly download files into a P2P file sharing application. Through the support of magnet links, users can follow links to find specific files quickly and accurately. In short, getting the file is as easy as following a link - the magnet points to a specific file and launches the P2P program, adding the file to the user’s download list.

Magnet Links are an extension of a greater group of URIs/URNs (not to be confused with ‘URL’) - whereas a URL will point to a specific website; a URI will point to the specific contents, or, location of a file. Read the technical jargon for Magnet Links on Wikipedia.

The main reason for the conception of magnet links is for increased authenticity (and less redundancy) of files being shared via P2P programs. For example, if you conduct a search for something specific in a filesharing program (such as Limewire), you’ll notice “multiple sources” for some of the results. We don’t have to tell you that ‘multiple source’ files offer the best availability, in terms of transfer speeds and chances for a successful ‘working’ download. All of the sources use the same hash link (that points to the exact same file).

Magnet links were developed for the purpose of standardizing the existing hash formats. There is no standard for hash links (URI-schemes) that has been universally accepted by all P2P networks/clients (at least, not for downloading) thus it would be virtually impossible for a network to offer support for each one, let alone a P2P program. The magnet link solves this by acting as an umbrella for many types of hashes. Users therefore only require a P2P program that supports “magnet links” in order to employ the functionality and compatibility of most hash formats.

Here are some common formats of hash links:

  • SHA1 (and newer SHA variants)

  • MD4/MD5

  • TTH (Tiger Tree Hashes)

  • BitPrint (a combination of both SHA1 and TTH)

  • eD2k hashes

  • BTIH (BitTorrent hashes - specific to Azureus)


Magnet links will typically support multiple hashes (URIs/URNs) in the same “link”. The Magnet URI starts with “magnet:?” as its prefix. Here’s how a magnet link appears when “hovered” over, as displayed in the bottom of a browser:


Anti-Tampering


When a file is created, a hash is generated that is specific to that exact file, and it alone (although there is a slight possibility that the same hash could point to two different files, but the odds are billions to one against it). If a file (in this case, a P2P release) is modified even in slightest way, the hash value for it changes completely.

Say, for example, the MPAA downloads a good known P2P movie release, and somehow modifies it so that it won’t play, or so that it’ll display an anti-piracy message. If they redistribute that file back into the P2P network, the hash value will now be totally unique, and the file will not appear in the “group” of good files for a particular release.

Magnet links are becoming the standard protocol for most “hash links” due to their versatility. Here are just some of the P2P programs that currently support them:


Since magnet links are designed to provide a viable link to an authentic file, P2P users are better served by searching for the magnet link of a particular file, as opposed to conducting queries from within the P2P client. This is exactly what makes the eDonkey network so popular - eD2k hash links.

If you have the proper magnet link, you can pretty much be assured that you’ll get the proper desired file (and not some decoy or spoof), without having to download it first. And since magnet links are so highly accurate in what they point to, websites that host them have come under fire from anti-piracy organizations. Their efforts towards spoofing or flooding of the P2P networks with bad or bogus files is utterly useless to anyone who uses good links.

Here are a handful of websites that host magnet links to directly download files into your P2P program Peerweb, Bitzearch & Bitzi.

www.peerweb.org


PeerWeb is a great solution to finding magnet links in a variety of categories. Supports G2 clients (Shareaza, BearShare) and a few Ares P2P magnets (arlnk:// files). PeerWeb requires user registration before the links can be accessed. We recommend browsing the PeerWeb Forums for even more links.

Our Notes: Most of the links pertain to the Gnutella 2 P2P network (G2) and are not compatible with Azureus (you’ll have to use a G2 client, such as Shareaza, as your default magnet handler). We also recommend that you connect to a good eDonkey network in Shareaza, in order to maximize connectivity. If you have no idea how to go about this, follow these easy steps:

1. To add an eD2k network into Shareaza, visit http://xtrememule.com/forum/ and click on one of the eD2k servers underneath the Servers heading (on the leftside of the site - see image below).


We suggest the top servers (Razorback 3.0 or 3.1) - click this link. Assuming Shareaza is your magnet handler, it should now launch this message, asking you to “launch the application”. Do so.


2. Shareaza should now open up. You’ll get a “Shareaza URI Manager” screen. Click “Connect”.


3. To verify that you are connected to it, click on the NETWORK icon, and look for a server listed as eDonkey, with the name “RazorBack 3.1″ as chosen. This may take a few seconds for Shareaza to list it, but you’ll be looking for something like this:


Download a magnet link (from PeerWeb) into Shareaza - be patient while it searches for sources. Click on the TRANSFERS icon; the desired file will begin updating the number of sources for the file. Click on the small PLUS SIGN (+) next to the title, and this will open up all of the available sources for the download. For most transfers, you’ll likely be placed in a queue, and have to wait for downloading to commence. We realize this is slow to begin, but once the file is there for a while, speeds will increase. The “Q 3 of 37″ is your position number out of 33 available slots for downloading for that connected peer. All sources update simultaneously (as do the queues).


www.bitzearch.com


Bitzearch is a Bitzi ’search engine’ for G2 magnet links (Shareaza, Limewire, BearShare), but it’s main reason is to convert Bitzi files into BearShare-compatible links. NOTE: Bitzearch does not currently work for eDonkey/eMule (eD2k links), nor is it compatible with Azureus BitTorrent “magnet links” - therefore a G2-compatible client is required. Why we like it: Unlike Bitzi, search results are arranged from “best rating” to worst, with one-click access to the magnet links. Why we don’t: No eD2k links are shown in the results.

http://bitzi.com


Bitzi is a metadata search engine for magnet links (including eD2k links) from across the Internet. Currently, more than 2.7 million files are indexed. Since Bitzi is primarily a “community effort” with user-submitted file ratings, it’s an excellent resource for finding out if a specific file is authentic (or of good quality) - search results are ranked (i.e. “rated”) throughout the results. Files that are deemed “bad” are also shown in the results, and should thus be avoided.

Bitzi - Searching Explained


Launch Bitzi.com and enter a query in the search window (at the top right corner). For our example below, we searched for “No Country For Old Men”. Click the desired link (see our tips below) and you’ll (usually) have two choices for downloading - either the magnet link or the ed2k link.


NOTES/TIPS:Results are not necessarily arranged in the best order (or most recent), nor are the files listed as “Best Version” explicitly just that. As in the example above, the “best version” listed is NOT the one you want to be downloading. Since this is community submitted, often a file that is ‘older’ will have higher ratings, and in situations where you’re searching for the latest versions of a file, these ‘ratings’ will have a negative impact on the results. This is especially true when searching for the latest version of a movie - Bitzi will report ALL versions, including CAMs, DVDSCRs, etc. - when all you want is the most recent DVDRIP release. You should be looking for a version that has a proper release group associated with it. For this, use an NFO website such as NFOHump to validate a proper release, and then cross-reference with it on Bitzi.

Specific Searching: Using ‘Dupecheck‘ websites with Bitzi


It’s fairly simple to validate a proper scene release with files found on Bitzi. For our example, follow these steps:

1.Visit NFOHump and search for “No Country for old men”.


2.You’ll notice that the proper release associated with it is by the release group “Diamond” as shown below. Diamond is the preferred version, since it is a DVDRiP (the most recent release), not a DVD screener.


3.Go back to Bitzi.com, and either look for the ‘Diamond’ release among the search results, or (recommended) you can conduct the search with the word “diamond” in the keystring (i.e. “no country for old men diamond”). As shown below, these are the files that are pertinent to the proper scene release, and thus are the two files you’ll be wanting to download:

Bitzi - Advanced Searching


In addition to searching, Bitzi offers a vast community of user-submitted links. We highly endorse that you use this tip in addition to conventional searching. In Bitzi BitSocieties, users can browse other user’s submissions, categorized in specific groups or genres. Here are just a few interesting BitSocieties:

  • Movies - DivX, XviD, DVD movie files.

  • Lossless Audio - Full CD images in lossless audio formats.

  • Music Videos - Group dedicated to…well, you guess!

  • Bookshelf - eBook releases in various formats.


Bitzi users can also view individually submitted files from other users from within the BitSociety.

Q: I’m not sure if I have a magnet handler. When I click a magnet link, I get an error message in my browser. What gives?

A: The most probable case is that you don’t have a “magnet-compatible” client, or it isn’t set up correctly to handle magnet links. You can try re-installing Shareaza, Limewire etc. and if asked, choose it to be your magnet handler (this probably won’t happen until you run the program for the first time). However, this doesn’t always work (especially if you’ve uninstalled a P2P client that was the default handler). Here are the error messages you’ll likely encounter in your browser if no P2P programs are associated with magnet links:

— **Firefox

** is looking for an external program that isn’t associated with magnet links, as evident of the Application: <Unknown> message. Wait a few seconds and try to click the “Launch application” button at the bottom. This may or may not launch a default P2P program that handles your magnet links. If not, you’ll be able to fix this here.


— For **Internet Explorer

**, the magnet link URI will cause an error message where you will NOT have the option of ‘launching an application’ to try to open the magnet link. (You’ll be able to “Search online for a program…” but this is useless). Keep reading…


P2P Magnet-handler association:


The Windows Registry needs to associate a program with magnet links, and this fix will work with any browser. You can do this the long way, or the short way (both are the same thing).

**SHORT:

** This quickfix makes Shareaza your default magnet handler. Download this file (magnet2.reg) and double-click it to import the settings into your registry. NOTE: This will only work if you’ve installed Shareaza to it’s default directory (C:\Program Files\Shareaza). If not, you’ll have to manually change the path in the magnet2.reg file.

**LONG:

** Create a new *.txt file on your hard drive, and open it with Notepad. Copy & paste the text below into it.

REGEDIT4

[HKEY_CLASSES_ROOT\magnet]
@=”URL:magnet Protocol”
“URL Protocol”=””


[HKEY_CLASSES_ROOT\magnet\shell]

[HKEY_CLASSES_ROOT\magnet\shell\open]

[HKEY_CLASSES_ROOT\magnet\shell\open\command]
@=”\”C:\Program Files\shareaza\Shareaza.exe\” \”%1\””


Save it and close it. Now, rename it to magnet2.reg and double-click it. This will import (merge) the necessary registry settings to associate magnet files with Shareaza.

Q: I already had Limewire installed, but then I installed Shareaza (or another) and made it the default magnet handler. How do I switch it back to Limewire?

A: Different P2P magnet-compatible clients (i.e. Limewire and Shareaza - or any other) will want to be the default handler - usually this can be “chosen” during the installation of the P2P client (or on the initial-run).


Depending on your configuration (i.e. P2P software, build numbers, etc.) you may be able to just switch back and forth and make each one the default as needed. If you are unable to select it as ‘default’ when the correct application launches, you can still fix it:

P2P Magnet-handler conflicts:


Each P2P program that is capable of handling magnet links will attempt to be the default magnet handler. If you already have a client such as Shareaza installed, and then you install Limewire, you’ll likely be asked if you’d wish to make Limewire the default handler (but not always). Depending on the P2P program (and in which sequence they were installed), this can often lead to a ‘permanent’ or undoable decision within the Windows registry. If you’ve made a mistake by letting one program handle them (but you now wish for another to do it), again create a magnet2.reg file (or download the existing one and edit it by right-clicking) and change the parameter in the last line:

[HKEY_CLASSES_ROOT\magnet\shell\open\command]
@=”\”C:\Program Files\shareaza\shareaza.exe\” \”%1\””


If you’d like Limewire to open magnet links, change the last line to:

@=”\”C:\Program Files\Limewire\Limewire.exe\” \”%1\””

Don’t forget to save it, and re-run ‘magnet2.reg’ to merge your new settings. Limewire will now be the new default handler.

NOTE: This assumes that Shareaza or Limewire were installed to the default directory (at C:\Program Files\Shareaza or \Limewire). Again, the parameter can be changed to fit any P2P program that supports magnets (such as Bearshare) - just change to the proper path (i.e. C:\Program Files\Bearshare\Bearshare.exe), pointing it to the proper name / location of the executable P2P program (Bearshare.exe).

NOTE: Uninstalling one of the P2P programs will not necessarily result in another one gaining the rights to being the new “default” magnet handler. This is certainly the case with RevConnect (a Direct Connect client) - after installation, it remains set as the default regardless of what P2P program you install afterwards. So a modification in the Windows registry is the only thing that fixes this. Additionally, there are other ways to alter these settings in the registry (if you’re feeling brave enough to do it yourself) but the above method is by far the simplest method of changing it.


Source From http://filesharefreak.com

How To Convert MKV to MP4 - MKV to MP4 Converter

- No comments
OJOsoft Total Video Converter offers fast and easy access to MKV to MP4 conversion. It is the best MKV to MP4 conversion tool for coding MKV files to your desired MP4 format or other formats such as PSP, MPEG, WMV, Apple TV, iPhone, etc.. It can as well fast convert to MP4 from MPG, SWF, Google video, TOD, H.263, etc.. Follow the MKV to MP4 guide to learn how to use the converter.

Now free download the video converter. After the download is finished, run total-video-converter.exe file and follow the installation wizard instructions. Launch the conversion software to change MKV to MP4 format easy and fast.

Free Download Buy now


Easy tutorial for converting MKV to MP4


Now write MKV with subtitles embedded to MP4 with the help of step-by-step MKV to MP4 guide and the powerful MKV to MP4 format converter. Flash demo of the MKV to MP4 conversion guide is also offered.

Convert MKV to MP4 - MKV to MP4 Converter


1. Load the files into your MKV to MP4 for transcoding.

Next to the Input File Name section, click the Browse button to load your MKV with its file extension of .mkv files for the conversion. Drag and drop will also do the task.

2. Click right button on MKV to MP4 converter utility to verify the output format and check the right output profile.

Click TO MP4 on the toolbar, then open the MP4 Profile drop-down menu to select the appropriate file quality for MKV to MP4 coping. Keep in mind the higher quality will take up more space. But you can use the Edit button to adjust the output settings so that the output is best for your device.

3. Press the gray Convert button in the bottom right corner of the MKV to MP4 converter shareware window. The MKV to MP4 changing process will begin and should take times from a few seconds to up to 15 minutes to complete, depending on the MKV file's size. A progress bar will be displayed within the program window, allowing you to see the estimated conversion time. You will be notified by the program when the coding from MKV to MP4 is complete.

Best MKV to MP4 conversion tool functions


OJOsoft Total Video Converter is not only a powerful MKV to MP4 converting tool, it also provides an easy way to convert VOB, XviD, H.263, WMV, DAT, and make fast conversion of AVI to MPG, AVI to VOB, AVI to WMV, WMV to MPEG, etc..

The MKV to MP4 converter program allows you to select settings like video size, bit rate, NTSC/PAL, frame rate, audio codec, sample rate for your output. Safe to install and viruses-free, and there are no spyware and adware in OJOsoft Total Video Converter.

Free Download Buy now Details


MKV format and MP4 - Important info


Video format MKV


An MKV file is an alternative to the popular AVI and MP4 formats and it also surpasses them in many areas. It is the file extension of Matroska Multimedia Container which can hold an unlimited number of video, audio, picture or subtitle tracks inside a single file.

MP4


File extension MP4 description: A file with extension mp4 is a MPEG-4 multimedia file format. MPEG-4 is an International Standards Organization (ISO) specification that covers many aspects of multimedia presentation including compression, authoring and delivery. Although video compression and file container definition are two separate and independent entities of the MPEG-4 specification, many people incorrectly believe that the two are interchangeable. You can implement only portions of the MPEG-4 specification and remain compliant with the standard. The MPEG-4 file format, as defined by the MPEG-4 specification, contains MPEG-4 encoded video and Advanced Audio Coding (AAC)-encoded audio content. It typically uses the .mp4 file extension. Windows Media Player does not support the direct playback of the .mp4 file format. You can play.mp4 media files in Windows Media Player when you install DirectShow-compatible MPEG-4 decoder packs. DirectShow-compatible MPEG-4 decoder packs include the Ligos LSX-MPEG Player and the EnvivioTV.

Convert MKV to MP4 - Recommended converter tools


Converting Google video to AVI, AVCHD to AVI, AVI to WMV, AVI to MPG, AVI to MPEG4, MPEG4 to AVI, OJOsoft AVI Converter is your best converting shareware.

For conversion of FLV to AVI, YouTube to PSP, DivX to AVI, Flash to AVI, MOV to AVI, you can also free download OJOsoft HD Video Converter, conversion software for MKV to MP4, which can convert video formats at the fastest speed.

Enjoy your favorite files on portable media players with the help of OJOsoft MP4 Converter. The conversion tool is quite useful in coping YouTube to MP4, MP4 to WMV, WMV to MP4, Google video to MP4, free try.

For turning MPG to MP4, M4V to MP4, YouTube to iPod, MTS to iPod, OJOsoft iPod Video Converter is your most helpful extractor.

Source From http://www.ojosoft.com

How To Convert PDF Files To Microsoft Word Format

- No comments
While the newer versions of Microsoft Word (e.g. MS Word 2010 and 2013) provide an easy mechanism to convert Microsoft Word files to PDF format, it can be quite tricky to convert PDF files to MS Word formats, (such as Doc or Docx). In this post we will provide you with numerous applications which can be used to convert your PDF files to MS Word format. In case you are looking to convert PDF to PowerPoint format, you can use tools like PageFlip, Able2Extract and Wondershare PDF to PowerPoint Converter.

Convert PDF to Word

Adobe Acrobat XI Pro


Perhaps one of the best tools for editing and converting PDF files is Adobe Acrobat XI Pro. As Adobe was the company that created the Portable Document Format, hence Adobe products can be rated as one of the best applications for PDF document management. Adobe Acrobat XI Pro allows converting PDF files to editable Microsoft Office formats, including MS Word format. Furthermore, you can even retain the original font and formatting to avoid ruining the look of the original document.

Convert PDF files to Word, Excel, and PowerPoint

So if you are thinking about how to convert PDF to Word, then give Adobe Acrobat XI Pro a try. Despite being a paid application, you can even download Adobe Acrobat XI Pro on a trial basis. Other than converting PDF to Word, you can also use Adobe Acrobat XI to convert PDF to PowerPoint or PDF to Excel. Adobe Acrobat XI Pro costs $199 and works with:

  • Windows XP

  • Windows Vista

  • Windows 7

  • Windows 8

  • Windows Server 2003

  • Windows Server 2008

  • Mac OS X 10.6.4 or later


Go to Download Adobe Acrobat XI Pro

Doxillion Document Converter


Doxillion Document Converter is an application for Mac and Windows based operating systems (including Windows 8), which allows converting files between various formats, including the conversion of PDF files to Doc and Docx format. As Doxillion is a multi-format file converter, you can not only convert PDF to Word but also convert files between RTF, TXT, HTML, XML, Openoffice (ODT) and image formats (JPG, PNG, GIF, BMP and Tiff).

Doxillion Document Converter

Doxillion Document Converter costs $19.99 and can also be downloaded on a trial basis. It works with the following operating systems:

  • Windows XP

  • Windows Vista

  • Windows 7

  • Windows 8

  • Mac OS X 10.3 or later


Go to Dowbload Doxillion Document Converter

Free PDF To Word Converter


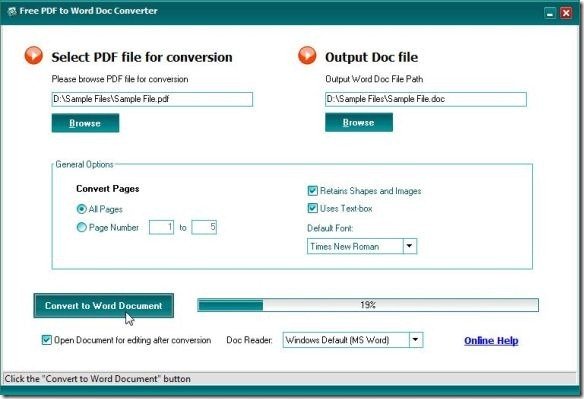
And if you are looking for a free solution for converting PDF files to Microsoft Word format then Free PDF to Word Converter is an excellent tool to get the job done. All you have to do is to select a source file and optionally specify which pages to convert. Once done, click Convert to convert your PDF file to MS Word or WordPad format.

Free PDF to Word Doc Converter_2013-01-08_11-04-42

As the name suggests, Free PDF To Word Converter is a free PDF converter. According to the developer he made this tool to facilitate people who are looking for a free PDF to Word converter and I must admit he has done a fine job. Free PDF To Word Converter works with:

  • Windows XP

  • Windows Vista

  • Windows 7


Source From http://www.free-power-point-templates.com

Design a Retro Postcard with 3D Text

- No comments
Postcards from the past have an idealistic view of vacation spots they are trying to promote that you can’t seem to find anymore nowadays; perhaps because we no longer send post cards, but rather rely on email. In this graphic design tutorial, we are going to take a popular retro style of having text with different images within each letter and recreate it. We will use Illustrator and Photoshop in concert to come up with an awesome retro postcard.

Preview


Click on the image to see it in full size.


Tutorial Resources


Step 1: Finding Inspiration


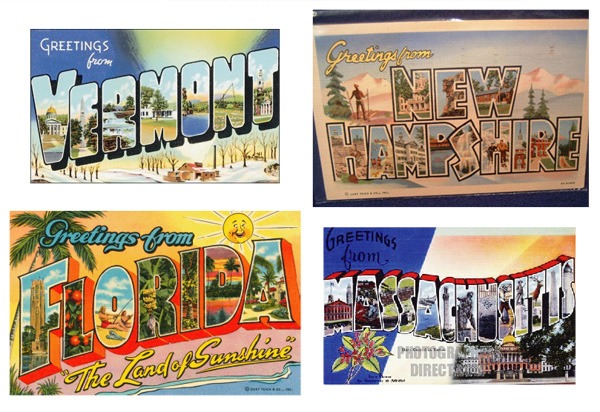
We are going to start off by getting some examples of actual retro postcards that have a similar theme to what we are going for, with the 3D looking text as our focal point. I went to Google Images and searched for old postcards of New England and Florida for inspiration. If you have a favorite vacation spot of your own, search for it. These are what I found:

Finding Inspiration

Looking at these, we can find some elements that we want to pull out of each, as well as elements that are consistent throughout. Some of the things we will be using are the black stroke with the white stroke inside of it, the 3D text, and the "Greetings from" text at the top left.

Step 2: Setting Up the Text


Now that we have some references, we can open up a 1200x655px document in Illustrator. This size comes out to be equivalent to 11x6in, which is a one of a few common sizes for postcards. You can go to Designers Toolbox to find more dimensions of postcards.

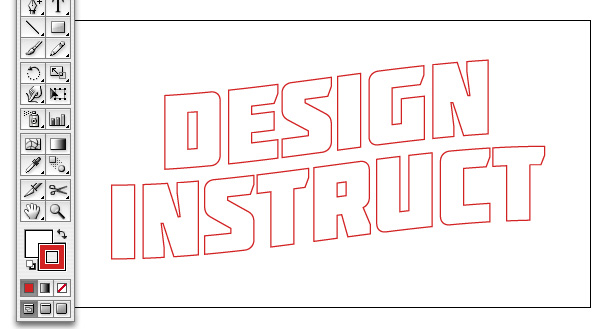
Use the Type Tool (T) with the Molot font to write "DESIGN INSTRUCT" on the artboard. Molot is a good, bold font that also has a retro look-and-feel to it.

Finding Inspiration

Step 3: Adding a Bend to the Text


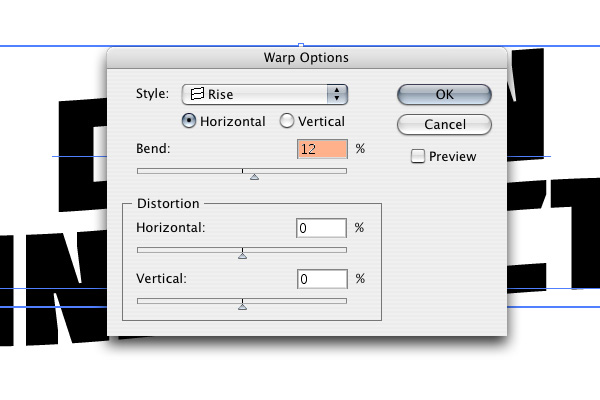
A few of the postcards we saw in our research have text that bends, and I liked that style, so we are going to mimic that a little bit. We can make our text bend by going to Effect > Warp > Rise. Change Bend to 12%.

Finding Inspiration

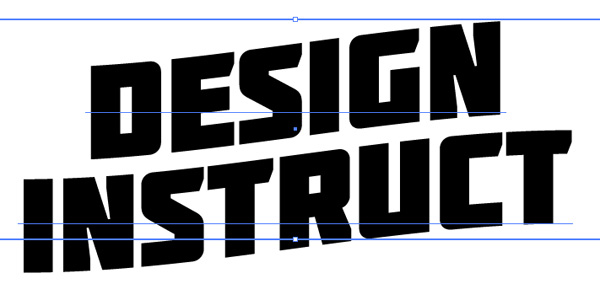
What we end up with is text that looks wavy.

Finding Inspiration

Go to Object > Expand Appearance. This will change our text into point and line shapes, which will be easier to work with for the next steps.

Step 4: Change the Stroke and Fill Colors


I like the idea of having the strong contrast of the red and black shadows like in the Massachusetts postcard, so let’s pull that concept out and into our design. All we need to do for now is change the Stroke of the text to red (#D22323) and the Fill to white (#FFFFFF). We’ll complete this look in the next steps.

Finding Inspiration

Step 5: Make the Text 3D


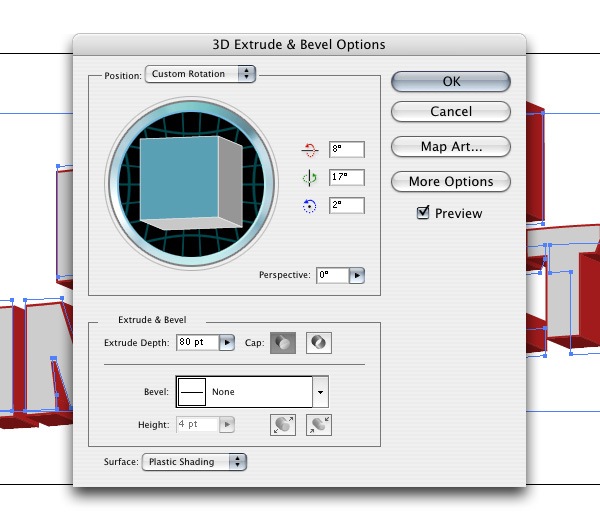
To make the 3D text, go to Effect > 3D > Extrude & Bevel. Adjust the Extrude & Bevel options so that your text has an angle similar to what is shown below, with the text facing up and to the left. Set Extrude Depth to 80pt as well.

Finding Inspiration

Finding Inspiration

Step 6: Adding a Black Stroke


Go to Object > Expand Appearance to convert our 3D text into vector points and lines.

With the 3D text selected, ungroup it by going to Object > Ungroup. Around each letter should be a red stroke. Click on each one and change their color fills to black.

Adding a Black Stroke

Step 7: Add a Black Shadow


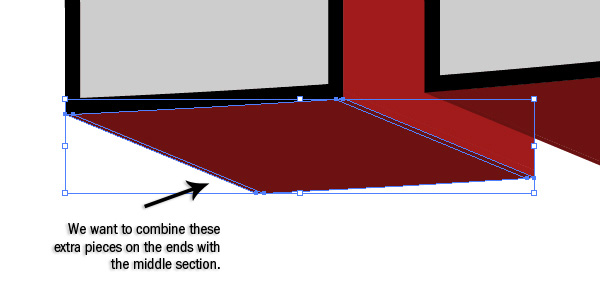
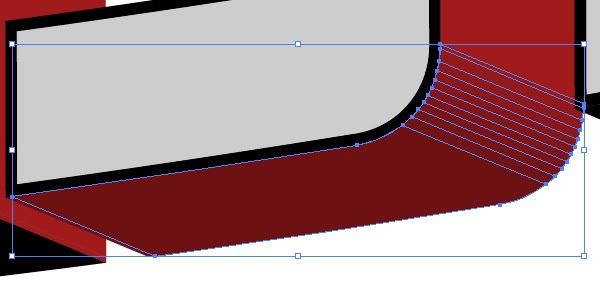
Next, we want to start adding in the black part of our shadow. Depending on the font you use, you may have some extra pieces on each side of the letter.

Add a Black Shadow

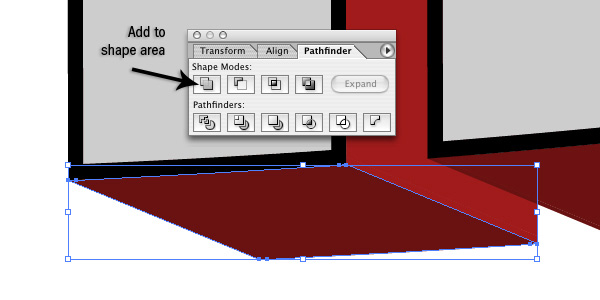
First, make sure the Pathfinder Panel is visible; if it’s not, go to Window > Pathfinder. We want to select all the pieces using the Selection Tool (V) and then, in the Pathfinder Panel, click on the Add to Shape Area button. Afterwards, change the Fill color to black. Do this for each side that is facing down. You can ignore the curved shapes for now.

Add a Black Shadow

Add a Black Shadow

Step 8: Adjusting the Curvature of the Letters


Now we can adjust the bends manually on some characters. We’re going to work on the shapes of the "D", "R", and "S". First, select the curve shape, and then duplicate it by going to Edit > Copy (Ctrl/Cmd + C) and then Edit > Paste in Front (Ctrl/Cmd +F). Change the color of the duplicate object to black.  Switch to the Pen Tool (P) and click on the anchor points shown below to delete them. Delete the anchor points until you get half way through the curve.

Adjusting the Curvature of the Letters

Step 9: Connecting the Red Shadows


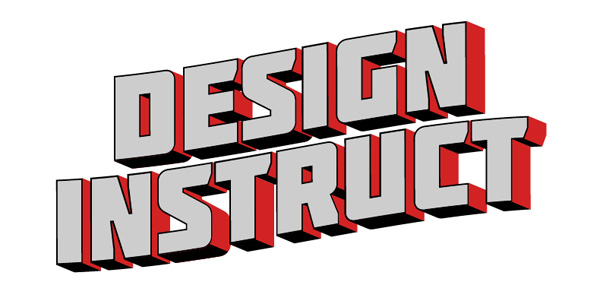
Like we did is Step 7 (with the black shadows), we want to select all the red shapes that are next to each other and connect them with the Add to Shape Area command in the Pathfinder Panel. Change the Fill color of the red (#D22323) that we used earlier on.

Connecting the Red Shadows

Step 10: Adding a White Stroke


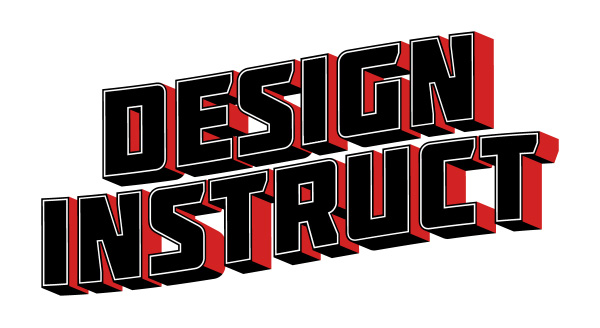
We want to create a white stroke inside the text, so first, what we want to do is select all the letter faces by holding Shift and clicking on each one to add them to the selection. After selecting all of them, change their Fill color to white.

Adding a White Stroke

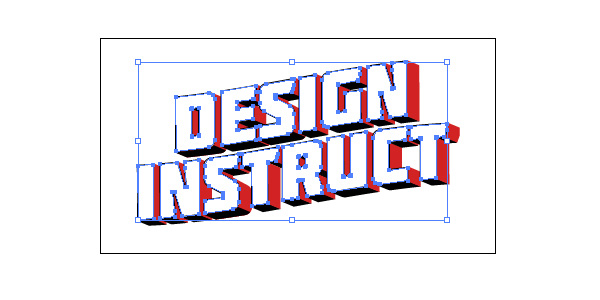
Now go to Object > Path > Offset. Change the Offset to -2px. Change the color of the new shape created by the Offset command to a blue color.

Step 11: Bringing the 3D Text into Photoshop


We can now bring the text into Photoshop. To start, create a new 1200x655px document in Photoshop. Bring our text into the Photoshop document by copying it from Illustrator and pasting it into the new Photoshop document. Adjust the size of the text so that it fits comfortably within the canvas.

Bringing the 3D Text into Photoshop

Note: Typically, if we are creating a postcard for print, we want to make the document 300 dpi, but for this tutorial, we are going to keep it at 72dpi for file size purposes. To read more about preparing your artwork for print, please read our guide to preparing files for print.

Step 12: Getting Rid of the Blue Parts


Using the Magic Wand Tool (W) with Tolerance at 30, click on the blue part of the text. Then go to Layer > New > Layer to create a new layer and then fill the selection with black using the Paint Bucket Tool (G). Don’t deselect yet.

While we still have the selection, go to Select > Modify > Expand. Expand the selection by 2px. Switch back to the original text layer and fill the selection with white. This will get rid of the blue color, and we will use the layer with the black fill as a mask for our images later on.

Getting Rid of the Blue Parts

Step 13: Preparing the Background Image


We can now start adding in some photos. Let’s start with the background of our postcard. We are going to use the Field 4 stock photo because it’s a simple image that won’t detract a lot of attention away from our foreground (our 3D text).

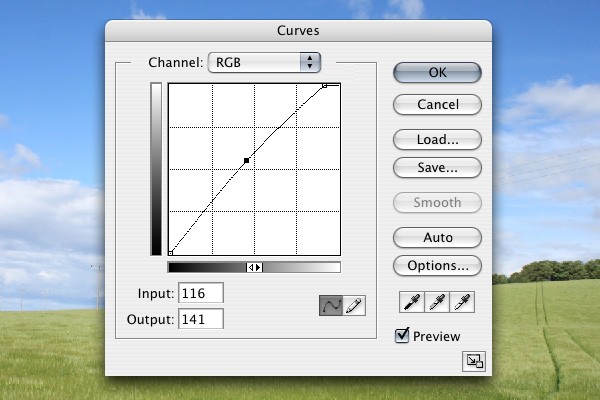
Download and open up the field photo in Photoshop. Next, we’re going to adjust the colors of the background image — do so by going to Image > Adjustment > Curves; adjust the curves to what I have below:

Preparing the Background Image

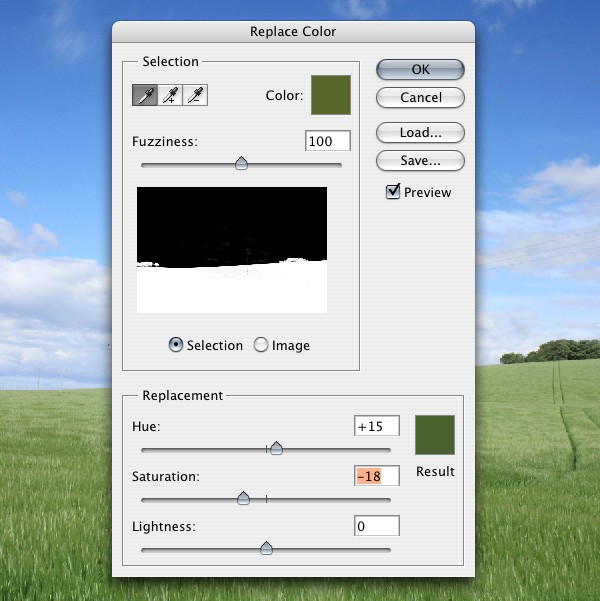
Now we want to adjust the color of the grass to give it a more faded appearance, which will go well with our retro theme. Go to Image > Adjustment > Replace Color. Hold down Shift and click on the green areas in the canvas until you have selected everything. Press OK when you’re satisfied with the color replacement adjustment.

Preparing the Background Image

Time to bring the processed field photo into our main Photoshop document; place it as a layer behind the text.

Preparing the Background Image

Step 14: Adding the Letters


Let’s start placing photos inside the 3D letters. We are going to do one photo per two letters. Let’s start off with the Rhino 3 stock photo. Open it up in Photoshop, then bring it into our document. Ctrl-click/Cmd-click on the layer with the black letters (created in Step 12) to load a selection around the letters. Choose the Polygonal Lasso Tool (L) from the Tools Panel, hold down Alt/Option, and then create a shape around all the letters except the first two letters ("D" and "E"). This will remove the selection around everything except the first two letters.

In the Layers Panel, click on the rhino layer and go to Layer > Add Layer Mask >Reveal All. This will make it so the rhino image just shows up within the "D" and "E" letters.

To change the size of the image, click on the link icon between the layer and the mask, then click on the layer. This will allow you to change the size of it using Free Transform (Ctrl/Cmd + T) and move it around within the mask.

Adding the Letters

Repeat the same process for the other letters. You can use the stock images referenced in the Tutorial Resources section above, or use photos of your preference.

Adding the Letters

Step 15: Adding a Border to the Canvas


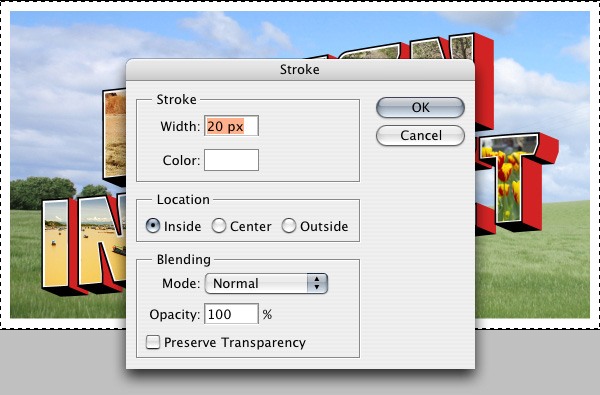
Go to Layer > New > Layer to create a new layer. Go to Select > All (Ctrl/Cmd + A) to load a selection around the canvas. Go to Edit > Stroke, change the Color to white (#FFFFFF), Width to 20px and Location to Inside.

Adding a Border to the Canvas

Step 16: Add Greeting Text


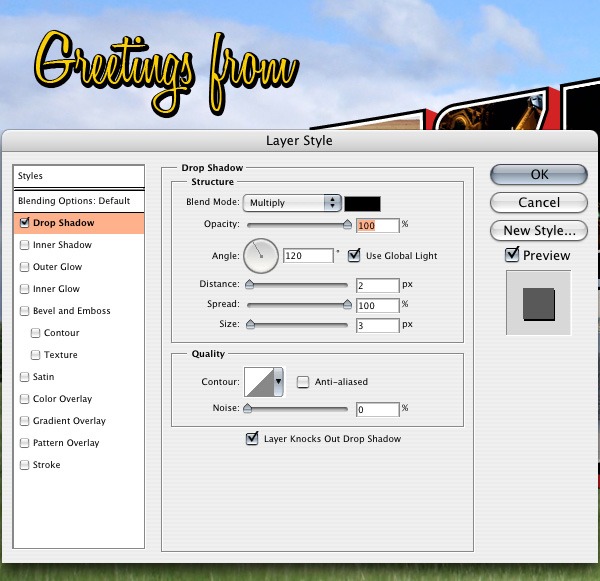
Use the Horizontal Type Tool (T) to write out "Greetings From" with the Honey Script font. Change the color to a yellow; you can sample a yellow color from one of the photos using the Eyedropper Tool (I).

We are also going to add a bold, black shadow to the greeting text. With the "Greetings From" text layer the active layer in the Layers Panel, go to Layer > Layer Style > Drop Shadow and then use the following settings:

Add Greeting Text

Step 17: Bringing in Some Texture


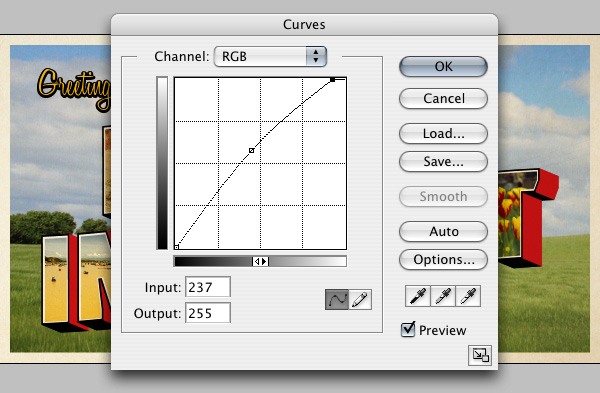
Now we are going to bring in this Paper Texture to give our piece an aged look. Once you’ve placed it in the Photoshop document, change its layer’s Blend Mode to Linear Burn and Opacity at 50%.

We are going to lighten up the texture a little bit, so go to Image > Adjustments > Curves and using the following settings:

Bringing in Some Texture

Step 18: Adjusting the Color


Let’s perform some color adjustments. Go to Layer > New Adjustment Layer > Hue/Saturation; use the settings shown in the image below:

Adjusting the Color

Now go to Layer > New Adjustment Layer > Gradient Map and use the settings shown below:

Adjusting the Color

Step 19: Creating a Subtle Vignette


Select the Rectangular Marquee Tool (M) and, in the Options Bar, change Feather to 60px. Create a new layer then drag a box around the whole canvas. Go to Select > Inverse and fill the inverted selection with black in the new layer, then change the layer’s Blend Mode to Overlay.

Creating a Subtle Vignette

Step 20: Adding Some Light


Finally, we are going to add a little bit of light in the middle of the postcard. Click on the Gradient Tool (G) and, using a white-to-0%-opacity radial gradient, create a small circle with the Gradient Tool in a new layer. Using Free Transform (Ctrl/Cmd + T), stretch the radial gradient to each side. Afterwards, change the Blend Mode to Soft Light.

Adding Some Light

Tutorial Summary


In this tutorial, we created a retro-styled postcard with the help of Illustrator and Photoshop. We gathered inspiration from existing postcard images, used Illustrator’s powerful vector-drawing capabilities (including the 3D Extrude & Bevel effect) and finished the piece in Photoshop using its handy photo-editing functions. Below is a preview of the final result:


Download Source Files